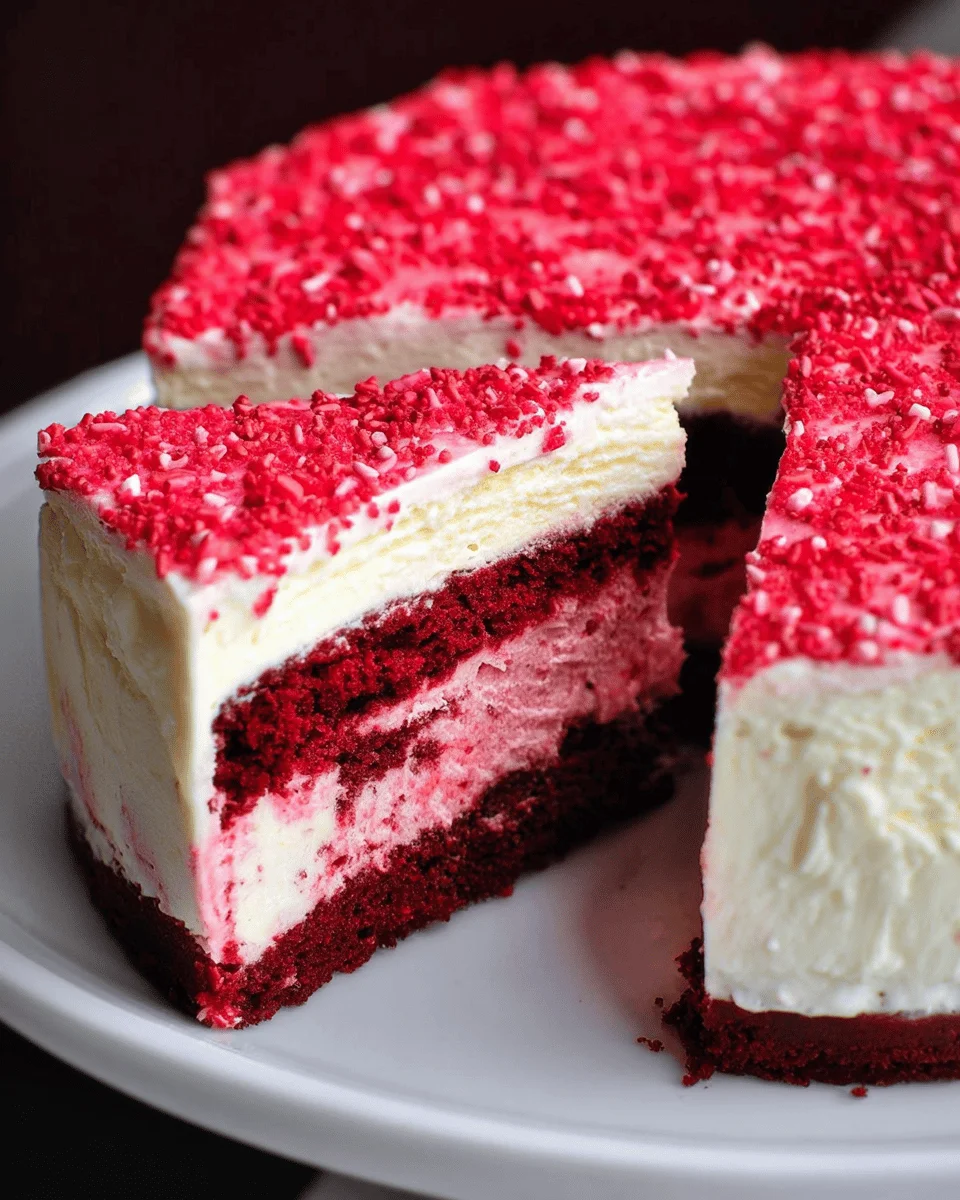
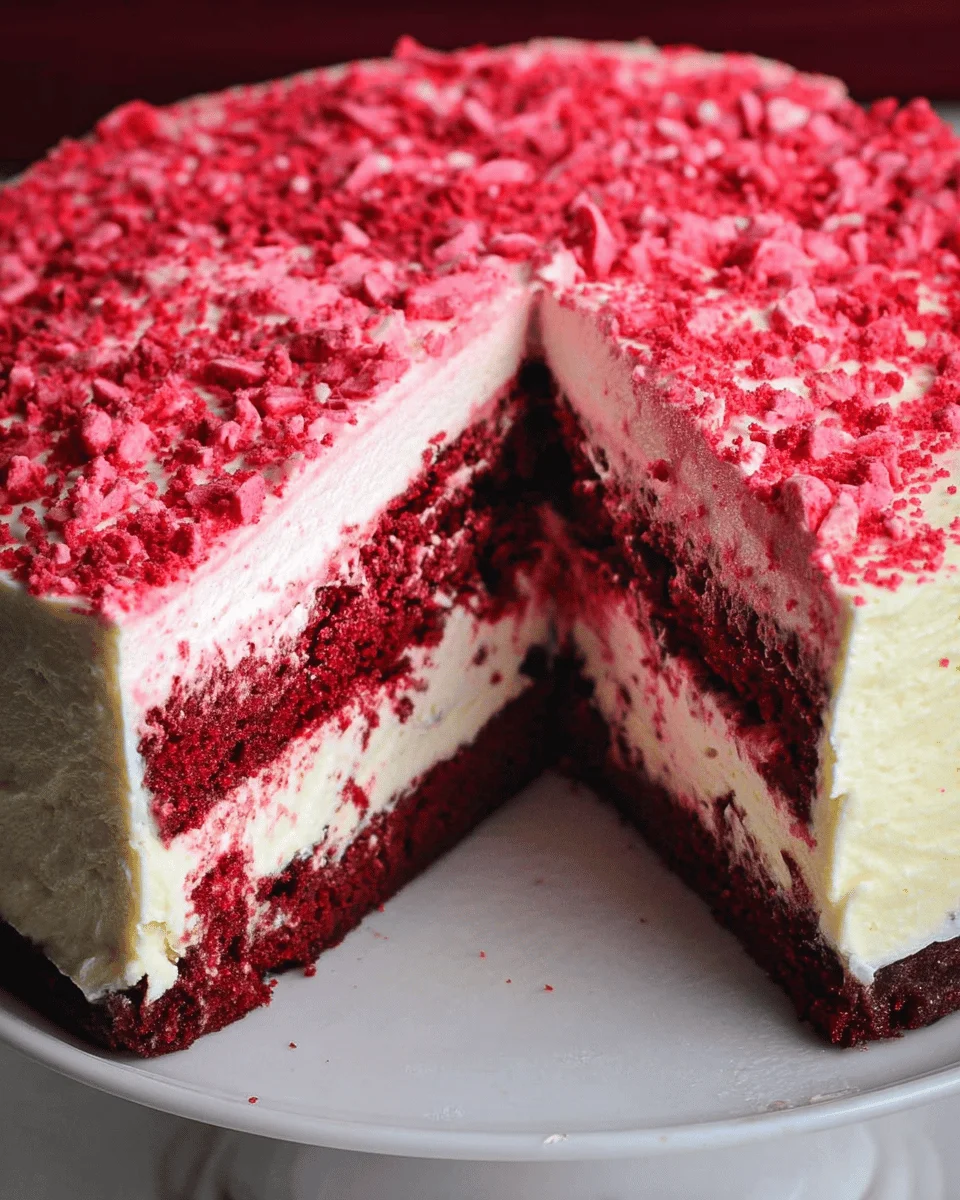
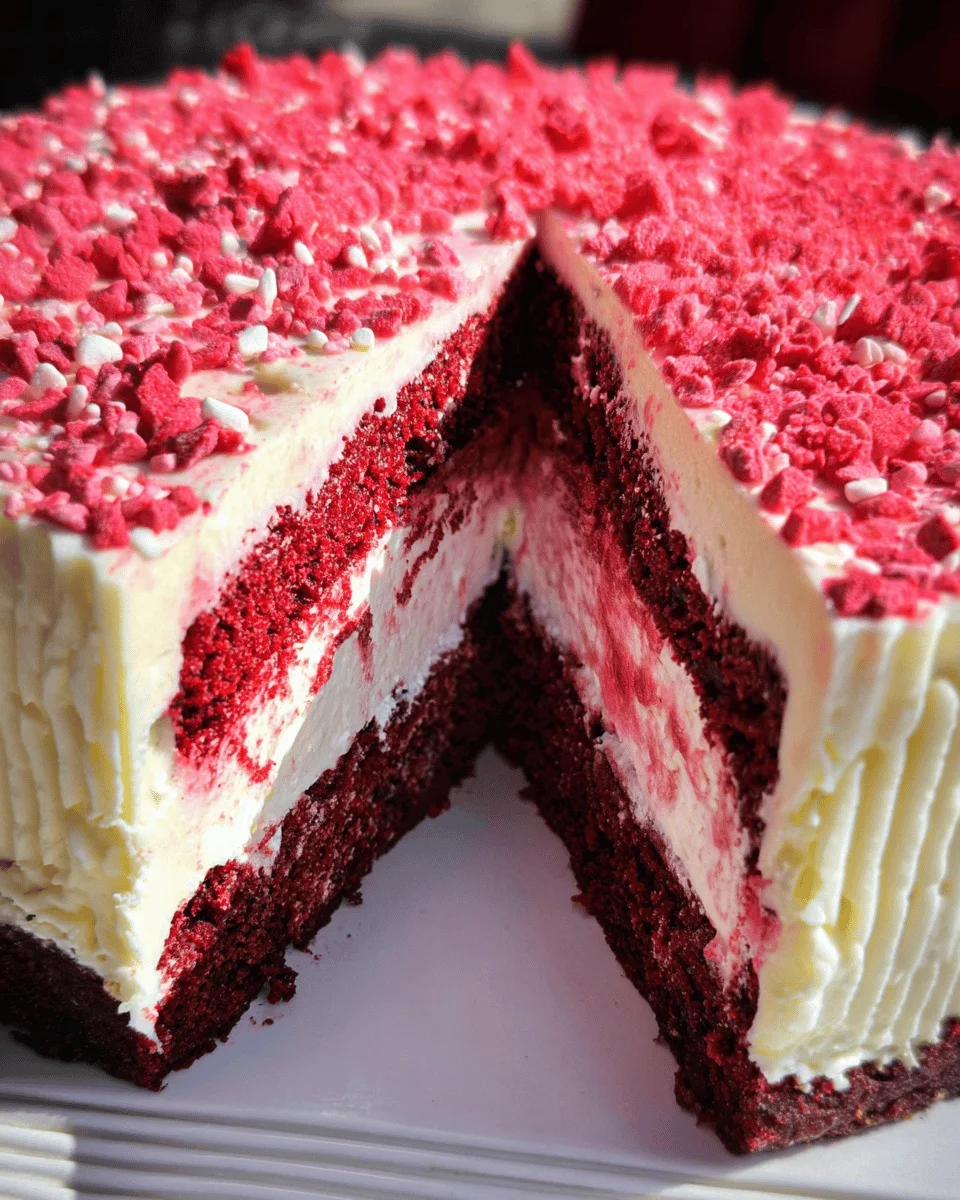
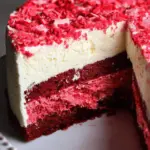
Red Velvet Cheesecake
This Red Velvet Cheesecake is a stunning dessert that combines the rich flavors of red velvet cake with the creamy texture of cheesecake. Perfect for birthdays, anniversaries, or any celebration, this cheesecake stands out with its vibrant color and delicious cream cheese frosting. The unique blend of buttermilk, cocoa powder, and a hint of vanilla creates an unforgettable flavor that will surely impress your guests.
Why You’ll Love This Recipe
- Decadent Flavor – The combination of cream cheese and red velvet gives a rich taste that delights every palate.
- Eye-Catching Presentation – Its striking red hue makes it a showstopper at any event.
- Versatile Dessert – Whether it’s for a cozy family gathering or a formal occasion, this cheesecake fits perfectly.
- Easy to Make – With simple steps, you can create this gourmet dessert without being a pro in the kitchen.
- Creamy Texture – The smoothness of the cheesecake pairs beautifully with the crunchy crust for a delightful contrast.
Tools and Preparation
To ensure your baking experience is smooth and enjoyable, having the right tools on hand is essential.
Essential Kitchen Tools
- Springform pan
- Mixing bowls
- Electric mixer
- Rubber spatula
- Roasting pan
Why These Tools Matter
- Springform pan – Allows for easy removal of the cheesecake without damaging its shape.
- Electric mixer – Ensures smooth blending of the cream cheese and other ingredients, saving you time and effort.
- Rubber spatula – Perfect for scraping down bowls and folding in ingredients smoothly.
Ingredients
This luscious cheesecake is inspired by a traditional red velvet cake and made with buttermilk, vinegar, cocoa powder, cream cheese frosting.
For the Crust
- 8 oz Oreo cookies (22-24 cookies) pulsed
- 4 tbsp unsalted butter (melted)
For the Cheesecake Filling
- 32 oz cream cheese (softened)
- 1/2 cup white granulated sugar
- 2 eggs (room temperature)
- 1/4 cup buttermilk
- 1/2 cup heavy whipping cream
- 2 tsp vanilla extract
- 1 tbsp white vinegar
- 2 tbsp cocoa powder
- 1 – 1 1/2 tbsp red food coloring
For the Cream Cheese Frosting
- 8 oz cream cheese (softened)
- 1/2 cup unsalted butter (softened)
- 1 1/2 cups powdered sugar
- 1 tsp vanilla extract
How to Make Red Velvet Cheesecake
Step 1: Preheat the Oven
Preheat your oven to 325 degrees Fahrenheit. Grease a 9-inch springform pan. You will need a large roasting pan that’s bigger than your springform pan. If unsure about your springform’s water resistance, wrap the outside in heavy-duty aluminum foil from bottom to top before adding any crust or batter.
Step 2: Prepare the Crust
- In a mixing bowl, combine the pulsed Oreo cookies with melted butter until well-mixed.
- Press this mixture firmly into the bottom of your prepared springform pan to form an even layer.
Step 3: Make the Cheesecake Filling
- In another mixing bowl, beat together softened cream cheese and granulated sugar until smooth.
- Add eggs one at a time, mixing well after each addition.
- Mix in buttermilk, heavy whipping cream, vanilla extract, white vinegar, cocoa powder, and red food coloring until fully combined.
Step 4: Assemble and Bake
Pour the cheesecake filling over the crust in the springform pan. Place this pan inside your larger roasting pan. Fill the roasting pan with hot water halfway up the side of the springform pan to create a water bath. Bake for about 85 minutes or until set but slightly jiggly in the center.
Step 5: Cool and Frost
Once baked, turn off the oven and crack open its door slightly to let it cool gradually for about an hour. Remove from oven and refrigerate for at least four hours before frosting. To make frosting, beat together softened cream cheese and butter until fluffy; gradually add powdered sugar and vanilla extract until smooth. Spread over cooled cheesecake before serving.
Enjoy your delightful homemade Red Velvet Cheesecake!
How to Serve Red Velvet Cheesecake
Serving your Red Velvet Cheesecake can elevate the experience and impress your guests. Here are some delightful ways to present this rich dessert.
Classic Slice
- A traditional slice of cheesecake garnished with a dollop of whipped cream for a simple yet elegant presentation.
Berry Compote
- Top your cheesecake with a fresh berry compote made from strawberries, raspberries, or blueberries. The tartness complements the sweetness perfectly.
Chocolate Drizzle
- Drizzle melted dark chocolate over the cheesecake for an indulgent touch that adds both flavor and visual appeal.
Cream Cheese Frosting Swirls
- Add swirls of cream cheese frosting on top for an extra creamy texture and beautiful decoration.
Crushed Nuts Topping
- Sprinkle crushed nuts, such as pecans or walnuts, on top for added crunch and a nutty flavor twist.
Mini Cheesecakes
- Consider serving individual mini cheesecakes in cupcake liners for a fun and portable dessert option at gatherings.
How to Perfect Red Velvet Cheesecake
Achieving the perfect Red Velvet Cheesecake involves attention to detail. Here are some tips to ensure your cheesecake turns out flawlessly.
- Use room temperature ingredients: Allow the cream cheese and eggs to sit out before mixing. This helps create a smooth batter without lumps.
- Don’t overmix: Mix just until combined to avoid incorporating too much air, which can cause cracks during baking.
- Water bath technique: Baking the cheesecake in a water bath prevents it from drying out and minimizes cracking.
- Cool gradually: After baking, let the cheesecake cool in the oven with the door slightly ajar. This helps avoid sudden temperature changes that can cause cracks.
- Chill overnight: For the best flavor and texture, refrigerate your cheesecake overnight before serving. It allows the flavors to meld beautifully.
- Use quality cocoa powder: A high-quality cocoa powder will enhance the chocolate flavor in your cheesecake, making it richer and more delicious.
Best Side Dishes for Red Velvet Cheesecake
Pairing side dishes with your Red Velvet Cheesecake can create a balanced meal. Here are some delightful options that complement its richness.
- Fresh Fruit Salad: A mix of seasonal fruits provides a refreshing contrast to the creamy cheesecake.
- Vanilla Ice Cream: A scoop of vanilla ice cream adds a classic touch and enhances the overall dessert experience.
- Chocolate Mousse: Light and airy chocolate mousse pairs beautifully with the dense texture of cheesecake.
- Whipped Cream: Simple yet effective, whipped cream adds lightness and extra creaminess when served alongside.
- Caramel Sauce: Drizzling warm caramel sauce over each slice brings out new flavors and adds sweetness.
- Coffee or Espresso: A cup of coffee or espresso can balance the sweetness while enhancing flavors with its bitter notes.
Common Mistakes to Avoid
When making this Red Velvet Cheesecake, it’s easy to overlook a few details. Here are some common mistakes and tips on how to avoid them.
- Incorrect ingredient temperatures: Using cold eggs or cream cheese can lead to a lumpy batter. Make sure to bring these ingredients to room temperature before mixing.
- Not preheating the oven: Starting with a cold oven can affect the baking process. Always preheat your oven to 325 degrees before placing the cheesecake inside.
- Skipping the water bath: This step helps in even baking and prevents cracking. Place your springform pan in a larger roasting pan filled with hot water for best results.
- Overmixing the batter: Overmixing can incorporate too much air, causing cracks during baking. Mix until just combined for a smooth texture.
- Underbaking: A slightly underbaked cheesecake will continue to set as it cools. Keep an eye on your timer and check for a slight jiggle in the center when you remove it from the oven.
Storage and Reheating
Refrigerator Storage
- item Store the cheesecake in an airtight container.
- item It will last up to 5 days in the refrigerator.
- item For best taste, consume it within 3 days.
Freezing Red Velvet Cheesecake
- item Wrap individual slices tightly in plastic wrap or aluminum foil.
- item Place them in a freezer-safe container or bag.
- item Frozen cheesecake will maintain its quality for up to 3 months.
Reheating Red Velvet Cheesecake
- Oven: Preheat your oven to 350 degrees and place the cheesecake in for about 15-20 minutes until warmed through.
- Microwave: Heat individual slices on medium power for about 30 seconds. Check if it’s warmed through before adding more time.
- Stovetop: Use a skillet over low heat, covering it with a lid. Heat for about 5-10 minutes, checking periodically to avoid overheating.
Frequently Asked Questions
What is Red Velvet Cheesecake?
Red Velvet Cheesecake is a creamy dessert combining classic red velvet cake flavors with rich cheesecake, perfect for any occasion.
How do I ensure my Red Velvet Cheesecake doesn’t crack?
To prevent cracks, bake your cheesecake in a water bath and avoid overmixing your batter. Check that you don’t overbake it as well.
Can I make this cheesecake ahead of time?
Yes! You can prepare this cheesecake one or two days in advance. Just store it properly in the fridge or freezer.
Can I customize my Red Velvet Cheesecake?
Absolutely! You can add chocolate chips, nuts, or even experiment with flavored extracts like almond or orange for unique twists.
Conclusion
This Red Velvet Cheesecake is not only visually stunning but also deliciously rich and creamy. Perfect for celebrations or as an indulgent treat at home, you can customize it with various toppings and flavors to suit your taste. Don’t hesitate; give this delightful recipe a try!
Red Velvet Cheesecake
Indulge in the rich, vibrant delight of Red Velvet Cheesecake—a dessert that beautifully marries the iconic flavors of red velvet cake with the creamy indulgence of cheesecake. This stunning creation is ideal for any celebration, from birthdays to anniversaries, and is sure to impress your guests with its eye-catching color and decadent taste. The unique combination of buttermilk, cocoa powder, and a hint of vanilla results in an unforgettable flavor experience. With simple steps and easily available ingredients, you can craft this gourmet dessert right in your kitchen.
- Prep Time: 30 minutes
- Cook Time: 85 minutes
- Total Time: 1 hour 55 minutes
- Yield: Approximately 12 servings 1x
- Category: Dessert
- Method: Baking
- Cuisine: American
Ingredients
- 8 oz Oreo cookies
- 4 tbsp unsalted butter
- 32 oz cream cheese
- 1/2 cup granulated sugar
- 2 eggs
- 1/4 cup buttermilk
- 1/2 cup heavy whipping cream
- 2 tsp vanilla extract
- 1 tbsp white vinegar
- 2 tbsp cocoa powder
- Red food coloring
Instructions
- Preheat your oven to 325°F and grease a 9-inch springform pan. Prepare a larger roasting pan for the water bath.
- Combine crushed Oreo cookies and melted butter, then press into the bottom of the springform pan.
- Beat softened cream cheese and sugar until smooth. Add eggs one at a time, mixing well. Incorporate buttermilk, heavy cream, vanilla, vinegar, cocoa powder, and red food coloring until fully combined.
- Pour filling over the crust and place the springform pan inside the roasting pan filled halfway with hot water. Bake for about 85 minutes or until set but slightly jiggly in the center.
- Cool gradually in the oven with the door ajar for about an hour before refrigerating for at least four hours.
- For frosting, beat together softened cream cheese and butter; gradually add powdered sugar and vanilla until smooth. Spread over cooled cheesecake.
Nutrition
- Serving Size: 1 slice (80g)
- Calories: 290
- Sugar: 22g
- Sodium: 220mg
- Fat: 21g
- Saturated Fat: 12g
- Unsaturated Fat: 7g
- Trans Fat: 0g
- Carbohydrates: 25g
- Fiber: 1g
- Protein: 5g
- Cholesterol: 70mg